Your final prints are due by Monday, December 12, by 10:00am.
The art office will be open as normal (7:30am-4:30pm), so if I am not in my office, then please go into the digital lab through the art office. Leave your final prints on the front table clearly labeled with your name. I will be emailing you all when everything is graded and ready to be picked up from the digital lab.
Thank you so much for a great semester! I hope you enjoyed the class. If you ever have any questions feel free to email me at ryan.jillianp@gmail.com
Wish you all the best!
Thursday, December 8
Sunday, December 4
Final Work Day
Tuesday, December 6
I would like everyone to have a working artist statement. This is not your final draft but you should have a good idea of what you need/want to say. I want everyone to have something on paper (either printed or handwritten) so that it can be shared with classmates and notes can be made. We will be spending part of the class reading these statements, discussing them and helping each other resolve any issues. In addition to working on artist statements, there will be some time for you to work on editing/printing. I recommend that you take advantage of the fact that I will be there, along with the rest of your classmates, and ask for input and ask any questions you may have. This will be a good time to hang your work, step back, think about details of editing and how you want to present your final prints.
For Tuesday:
- Artist Statement (on paper)
- Working images/prints
Tuesday, November 29
Work In Progress Meeting Schedule
Tuesday, November 29
2:20-2:40 Makenzie Pelletier
2:40-3:00 Madison Cooper
3:00-3:20 Jode Gayle
3:20-3:40 Chloe Frye
3:40-4:00 Sohee Kim
4:00-4:20 Sarah Hinzman
4:20-4:40 Rebecca Migotsky
4:40-5:00 Cydney Sloan
Thursday, December 1
2:20-2:40 Melanie Brody
2:40-3:00 Taylor Schwartz
3:00-3:20 Erica Lynch
3:20-3:40 Daniel Dias
3:40-4:00 Mike Lopez
4:00-4:20 Liz Ingoldsby
4:20-4:40 Jordyn Poole
4:40-5:00 Shannon Luck
Tuesday, November 15
Artist Talk Write-Up- Podcasts
Due by Thursday, December 8th
Listen to one of the following podcasts and write a one-page response. Your write-up should include a description of what was covered and discussed. Also, include your thoughts on the artist's work and what was said. Mention anything that stood out to you or caught your interest.
No. 7- Brian Ulrich (Soundcloud)
No. 7: Brian Ulrich, Andrew Russeth- Images from talk
No. 102- John Divola
No. 257- Anthony Hernandez
No. 168- Alec Soth
Sunday, November 13
Scheduling Final Critique- Doodle Poll
You guys will all receive an email from me via Doodle, an online poll that will help us schedule a date and time for our final critique. This is an easy way for me to collect all of your schedules and figure out what time would work best for everyone. Simply fill out the times that you are available on the selected days by checking the box when you are free and leaving it blank when you are busy. Click save to submit your responses. You should be able to go back in and edit your responses if anything changes.
Finally, I understand that you all have finals, classes, work, etc. but please be considerate and do not say you're busy if you really aren't (or if you just want to sleep in). There are 16 projects to get through, so I'm asking all of you to be as flexible as possible.
Email me with any questions you have.
Wednesday, November 9
Final Project
Throughout the semester I have developed assignments and projects specifically to help you learn about different aspects of photography. However, a huge part of being an artist means being self-disciplined and self-motivated. So, for your final project you will be responsible for developing your own project. I have determined general requirements and have set a timeline for the next few weeks, but you are responsible for coming up with the idea/topic of your project. Begin by writing down your thoughts in any form you choose, such as a list of subject matter, conceptual thoughts, narrative plots, places to photograph, questions you have, etc. Choose a subject/topic/idea that you are interested in and investigate it over the next few weeks.
You will write a one-page proposal describing your project and what you hope to investigate further through your photographs. You will present your project to the class with preliminary ideas, sketches, inspiration and work-in-progress. On the week of November 29th, each of you will meet with me individually to look at work-in-progress and discuss the development of your project. For the final critique you will write a short artist statement about your work, which will be presented at the time of your critique and posted on your blog along with your final images. For this project I strongly encourage you to print on paper larger than 8.5x11”. Refer to the requirements below for the number of prints required for each paper size.
Requirements:
Written proposal and presentation to class (due Thursday, November 17th)
Work-in-progress meeting (sign up for a slot on November 29th or December 1st)
Number of final prints:
12-15 prints if you’re printing at 8.5x11”
9-12 prints if you’re printing at 11x14” or 11x17”
7-10 prints if you’re printing at 13x19“
Artist statement
Final images and statement posted to blog before critique
Tuesday, November 8
Critique 4- Mystery Bag
Thursday, November 10
1. 4 prints ready to hang and turn in (portfolio)
1. 4 prints ready to hang and turn in (portfolio)
2. Those 4 images posted on your blog before critique
3. Contact sheet of all photographs taken for this project
We will be hanging four students' work at a time. Please begin hanging your work before class so we can begin promptly at 2:10.
3. Contact sheet of all photographs taken for this project
We will be hanging four students' work at a time. Please begin hanging your work before class so we can begin promptly at 2:10.
Larger Inkjet Paper
For your final project you have the option of printing your photographs larger than 8.5x11 and I strongly encourage you to do so. It is not only great to learn how to use larger paper with the printers, but it will also allow you to see your photos in a different way. If you would like to do so, here are some things you need to know:
- Put your order in ASAP if you're ordering paper online
- The printers in the digital lab can handle paper up to 17" wide (the short side). This means you can buy paper that measures: 17x22", 13x19", or 11x17" (these are the standards)
- Keep in mind the number of prints required for the final plus test prints, test strips and mess ups.
- As the paper gets larger, the price of purchasing a box increases. But, no fear, there are options that won't break the bank. And it is totally worth it.
- Remember that printing on matte paper is a big adjustment from luster paper. And you cannot frequently be switching back and forth between Matte Black and Photo Black.
Some paper suggestions:
Epson Ultra Premium Luster- good basic luster paper
11.7 x 16.5 - 50 sheets
13 x 19 - 50 sheets
Canon Photo Paper Pro Luster- good basic luster paper
13 x 19 - 50 sheets
17 x 22 - 25 sheets
Ilford Galerie Prestige Smooth Pearl- Similar to Epson Premium Luster, a little nicer
11 x 17 - 25 sheets
13 x 19 - 25 sheets
Canon Photo Paper Pro Premium Matte- good basic matte paper
13 x 19 - 50 sheets
Epson Ultra Premium Paper Matte- good basic matte paper
13 x 19 - 50 sheets
Ilford Galerie Prestige Gold Fiber Silk- Nicer, higher-quality, cotton rag, luster paper
8.5 x 11 - 50 sheets
11 x 17 - 25 sheets
13 x 19 - 25 sheets
13 x 19 - 50 sheets
For each of these brands and types of paper you should search for other sizes and quantities if the link is not the specific amount/size you are looking for
Additional websites:
Adorama
Hunts
Amazon
Sunday, November 6
Inspiration: Abstract + Still Life Photography
For your current project (Mystery Bag) I want you to really experiment with the materials you were given. Use the supplies in any way you would like: break them, cut them, use them to build something else, or use them in their normal state. For some inspiration I wanted to introduce the class to abstract photography and also revisit still life photography. Your images for this project do not have to be abstract or still life specifically, but I want you to be familiar with some alternative ways of approaching photography.


What is abstract photography?
An abstract image is one that has no direct association with the world or the object world. In other words, it is experimental, non-objective or conceptual in nature. Often times in abstraction contextual information is removed or obscured to convey an unreal experience, an idea or a sensation. Abstract photography often focuses on elements of color, texture, shadow and shape.


Aaron Siskind


Minor White


Wolfgang Tillmans

Ellen Carey


Roger Ballen
What is still life photography?
Still life photography depicts inanimate subject matter, most often arranged by the photographer. Unlike abstraction, still life photography directly relates to the object and its context in the world. The photographer has almost all control over the set-up, lighting and composition. As a result of this control, lighting and framing are very important in this genre of photography.


Shirana Shabazi


Jan Groover


Sharon Core


Brittany Marcoux


Hiroshi Sugimoto
(Dioramas Series)
Project 4- Mystery Bag
Photography is all about working with what you’ve got. For this project you will be working with strict limitations that will force you to think quickly and creatively. Inside of the bag I have given you, there are some mystery items that you must incorporate in your photographs. You are to use these materials to create temporary interventions within the landscape. Your images should show your engagement with both the location you have selected and an attentive investigation of the materials supplied for this project. You may work with additional supplies but the materials supplied for this project must play a dominant role in your images. You must go outside into the landscape, you must work alone and people are not to be the focus of your images. You must remove the supplies from the location after the image has been created.
Rules/Requirements:
Incorporate mystery items
Go outside into the landscape
Work alone
People may not be the focus of your images
Remove supplies from location after the image has been taken
4 final prints
Final images posted on blog before critique
Contact sheets of all photos taken posted on blog before critique
Critique: Thursday November 10
Tuesday will be a work day
Tuesday, November 1
Critique 3- Emulation
Thursday, November 1
1. 5-7 prints ready to hang and turn in (portfolio)
1. 5-7 prints ready to hang and turn in (portfolio)
2. Those 5-7 images posted on your blog before critique
3. Contact sheet of all photographs taken for this project
We will be hanging four students' work at a time. Please begin hanging your work before class so we can begin promptly at 2:10.
3. Contact sheet of all photographs taken for this project
We will be hanging four students' work at a time. Please begin hanging your work before class so we can begin promptly at 2:10.
Tuesday, October 25
HW
Due Thursday, October 27
2. Bring in object(s) for still life setup, and bring a tripod if you have one!!
3. Become an "expert" on the following lighting setups. Write a description of how it works and draw a diagram of the lighting setup with the subject, light source(s), and camera. You will be teaching the other members of your group.
Split Light:
Sarah
Sohee
Jordyn
Madison
Broad Light + Short Light:
Melanie
Shannon
Rebecca
Makenzie
Butterfly:
Jode
Mike
Liz
Cydney
Rembrandt:
Erica
Daniel
Chloe
Taylor
Meet in the Digital Lab at 2:10 and we will head over to the Service Building.
DON'T FORGET YOUR CAMERAS!
Batteries charged, memory card, ready to go...
In-Class Activity: Cutting/Pasting and Rearranging Compositions
Part 1:
Cutting and PastingUsing the photograph of yourself, replace the background. You will investigate 3 different approaches to making selections (magic wand, quick selection, lasso), refining the edge of your selection and how to copy, cut and paste. Repeat the following steps 3 times:
1. Open image in Photoshop
2. Duplicate Background layer
3. Isolate the figure from the background using the Magic Wand / Quick Selection / Lasso
4. Replace the background with another image or color field
5. Save working file as psd. Label w/ tool used to make your selection (Ex: RemoveBackground_MagicWand)
6. Save version for web (jpeg)
7. Post to blog
Part 2:
Making New Compositions
Create new compositions in Photoshop from the images provided. Explore the power of Photoshop’s editing capabilities by rearranging, duplicating, resizing, recoloring objects in the images. You may use any of the Transform functions, cut/copy/paste, adjustment layers, etc. but make sure to follow the rules given for each work of art. Choose to manipulate at least 2 of the following:
1. Kasimir Malevich- Black Rectangle, Blue Triangle, 1915
Rule: Use the Lasso tool to make your selections

2. Henri Matisse- Blue Nude IV, 1952
Rule: You have to use all seven parts to make your new composition

3. Kasimir Malevich- The Wood Cutter
Rule: Change at least one color on the figure

4. Kasimir Malevich- 18th Construction (Left)
Rene Magritte- Golconda (Right)
Rule: Use elements of both of these images in one composition


Monday, October 24
HW Reminder- Due Tuesday 10/25
Don't forget:
- Blog Post #6 was due on Friday at 5:00pm. Not everyone has posted yet!
- Points are taken off when you don't post your final images on your blog before each critique. Some people still haven't posted their Show Not Tell/Self Portrait images!
- Post your amalgamation edit from Thursday's class before class tomorrow
Materials for Tuesday:
Hard drive with individual portraits from amalgamation
Inkjet Paper
We will be working in Photoshop again. For one activity we will be using your portraits that were taken for the amalgamation activity (the original photos not the composite). I would also like to go over printing from Photoshop, so please bring your paper.
Tuesday, October 18
Blog Post 6- Photographer for Emulation
Due by 5:00pm on Friday, October 21
HW
Due Thursday, October 20
So, where are the photobooks in the library?
If you have already looked online at the library catalog for "photography," you'll know that the photography books can be found on Dimond-Level 2 in the TR section.

Requirements:
Bring photobook
Narrow down and bring list of possible options
Monday, October 17
Critique 2- Show Not Tell/Self-Portrait
Tuesday, October 18
1. 5-7 prints ready to hang and turn in (portfolio)
1. 5-7 prints ready to hang and turn in (portfolio)
2. Those 5-7 images posted on your blog before critique
For this critique, you do not have to post contact sheets of all of your images taken. I have seen your work in progress in class. Your images should show something about yourself. You will not be explaining your work at the beginning of your critique, so make sure that your images express what it is you're trying to say-- don't rely on your words. We will be hanging four students' work at a time. Please begin hanging your work before class so we can begin promptly at 2:10.
Thursday, October 13
Project 3- Emulation
You are to photograph a series of images by following in the tradition, style, process, or technique of another artist or photographer. The derivative work should be the reproduction of the conceptual and/or technical features of the chosen photographer’s work. You should intend to push and express your own vision and views without directly copying. In other words, leave room to develop and find your own ideas within the project. You will build a consistent body of work containing 5-7 images. I want to see variety as well as an in-depth exploration of the chosen photographer’s style, process, or technique.
Choosing a photographer: You may use any photographer for your emulation. As part of your research, visit the library and check out one photobook/book including the work of any photographer and bring it to class on Thursday, October 20th. The book does not have to contain the work of the photographer you choose. Together we will look at the books and build a collection of possible options. Once you have made your decision, you will write a blog post about your chosen photographer. See Blog Post #6.
Requirements:
Choose photographer
5-7 final prints
Final images posted to blog before critique
Related Assignments:
HW- Bring in photobook on Thursday, October 20th
Blog Post #6 due by 5:00pm on Friday, October 21st
Critique: Thursday, November 3
Things to keep in mind: Build a consistent body of work, explore old/new photographic materials and techniques, explore and nurture your own style
Sunday, October 9
HW
Due Tuesday, October 11
1. Edit and print scanned image. Your goal is to make a reproduction (as close a match as possible) of the original document. You will turn in your print along with the original scanned document at the beginning of class.
2. Edit and print Picnic Table image. You should work towards making your print look as natural as possible. Focus on the color casts both on screen and in your prints. Make subtle adjustments. Utilize the tone curve and adjustment brushes in Lightroom.
3. Have work in progress for Project 2: Show Not Tell/Self-Portrait. I will be looking at what you've done so far. Remember: Critique 2 is next Tuesday, October 18.
Materials for Tuesday:
Print of scanned image + original document
Print of Picnic Table image
Hard drive (with work in progress)
Portfolio box/binder (if I don't already have yours)
I will be returning the portfolios that I have with your work graded, you will swap out the images inside and turn in your scan and picnic table prints
Tuesday, October 4
Blog Post 5- Person, Place and Thing
For this assignment you will create a group of photographs that work together to describe one thing. You will explain and describe this thing/topic in three photographs: one of a person, one of a place, and one of a thing. The "Person" photograph must include a physical human presence. Photograph one person or multiple people that help describe your topic. The "Place" photograph should show an interior or exterior space the helps describe your topic. This could be the landscape or interior space something occupies or a place where something happened. The "Thing" photograph should include objects related to your topic. Photograph a still life, either found or created. The goal of this assignment is to open your eyes to the different ways you can describe something and explore the visual associations our minds create.
Requirements:
Choose one topic (state in blog post)
Post 3 photos:
Requirements:
Choose one topic (state in blog post)
Post 3 photos:
1 portrait (person/people)
1 place (landscape/interior)
1 thing (object/still life)
HW
Due Thursday, October 6
1. Edit/select portraits from class. Post to blog.
*Be ready to look at and discuss with class on Thursday*
2. Blog Post 5: Person, Place and Thing
3. Work on Project 2 (Show Not Tell/Self-Portrait)
Materials for Thursday:
Hard drive
Paper
1. Edit/select portraits from class. Post to blog.
*Be ready to look at and discuss with class on Thursday*
2. Blog Post 5: Person, Place and Thing
3. Work on Project 2 (Show Not Tell/Self-Portrait)
Materials for Thursday:
Hard drive
Paper
Monday, October 3
Project 2- Show Not Tell/Self-Portrait
Photographers are apt to draw inspiration from any number of places--our histories and dreams, long walks, paintings, music, novels, other people’s photographs, or the news. For this project you will be using yourself as inspiration to create a self-portrait, which will be in the form of a series of 5-7 images. The group of photographs may include portraits, landscapes and still lives.
I want you to imagine that you have somehow lost your ability to speak and the only thing you can use to communicate with others is your photographs. How would you represent yourself, or a certain part of yourself without words? You must show your audience through your photographs, not tell them using words. Your photographs must give a sense of who you are and what you feel (not just what you see or how you look).
Requirements:
Series of 5-7 images as self-portrait
No verbal or written description to your audience (classmates)
Final photos posted to blog before critique begins


Requirements:
Series of 5-7 images as self-portrait
No verbal or written description to your audience (classmates)
Final photos posted to blog before critique begins
Critique: Tuesday, October 18
Lee Friedlander


Cindy Sherman


Andrea Wallace

Nicholas Nixon


Saturday, October 1
HW
Due Tuesday, October 4
1. Read What Cannot Be Seen by Gerry Badger
2. Read The Photographer's Eye by John Szarkowski
3. Begin working on Project 2 (Show Not Tell/Self-Portrait). Brainstorm, take notes, make a plan, begin shooting
Materials for Tuesday:
Hard drive
Camera
1. Read What Cannot Be Seen by Gerry Badger
2. Read The Photographer's Eye by John Szarkowski
3. Begin working on Project 2 (Show Not Tell/Self-Portrait). Brainstorm, take notes, make a plan, begin shooting
Materials for Tuesday:
Hard drive
Camera
Wednesday, September 28
Critique 1- Exploring the Frame
Thursday, September 29
1. 5-7 prints ready to hang and turn in (portfolio)
1. 5-7 prints ready to hang and turn in (portfolio)
2. Those 5-7 images posted on your blog
3. Digital contact sheets of ALL images taken for the project posted on your blog
3. Digital contact sheets of ALL images taken for the project posted on your blog
For this critique, you should have no more than 2 close up images. Your images should show me that you can construct complex compositions. Step back and fill the frame with a number of elements and show me you can control the frame. We will be hanging four students' work at a time, so please do so before class so we can begin promptly at 2:10.
Thursday, September 22
Blog Post 4- UNH Alumni Photography Exhibition Write-Up
Using your notes from the Artwork Critique Form, write at least 4 paragraphs about the photograph or group of photographs you chose to look at. Describe the work, analyze the composition and content of the work, and interpret its meaning. Post the write-up on your blog along with an image of the piece(s).
For Tuesday:
Blog Post 4
Finish shooting for Project 1: Exploring the Frame
Edit your images and get them ready for printing
Be ready to edit and print on Tuesday
For Tuesday:
Blog Post 4
Finish shooting for Project 1: Exploring the Frame
Edit your images and get them ready for printing
Be ready to edit and print on Tuesday
Tuesday, September 20
HW
Due Thursday, September 22
1. Print the image you took for the Walk + Write activity
2. Print at least 2 images from your Color Theory homework
*Be ready to hang these prints for a mock critique on Thursday*
3. Have work in progress for Project 1: Exploring the Frame. Copy any photographs you've taken to your hard drive and import (to Lr).
4. Upload image from Walk + Write activity to blog if you haven't done so!
Materials for Thursday:
Prints
Hard drive (with some images for Project 1)
Pen and paper for notes
Don't forget about Colleen Mullins' talk
Thursday at 12:45
Room A218
Friday, September 16
HW
Due Tuesday, September 20
1. Finishing editing image from today's walk activity. Be ready to print on Tuesday with edited image and paper.
2. Post photograph from the walk activity on blog with some thoughts
3. Photograph for Project #1: Exploring the Frame
1. Finishing editing image from today's walk activity. Be ready to print on Tuesday with edited image and paper.
2. Post photograph from the walk activity on blog with some thoughts
3. Photograph for Project #1: Exploring the Frame
Thursday, September 15
Project 1- Exploring the Frame
Photograph the things you might normally overlook. Explore what is around you and experiment with translating it into a photograph. You will use different visual tools such as line, color and value along with principles of design to create dynamic and successful compositions. Use composition in as many different ways as possible. For each picture you must take at least 3 frames, changing something about the composition each time. Learn to be aware of every element within the frame. In your final group there cannot be more than 2 photographs taken close to the subject. Step back and fill the frame with more so you can learn how to control it. Remember: For this project you should not be focused on photographing beautiful things, but instead, making beautiful photographs.
Requirements:
5-7 final prints
Maximum of 2 close ups
At least 3 frames for each image, changing the composition in each
Digital contact sheets and final photos posted to blog before critique begins
Critique: Thursday, September 29
Some approaches to experiment with:
1. Extreme symmetry and asymmetry
2. Photograph in different types of light
3. Multiple angles of view: shooting from above or below the eye line
4. Shooting from the hip without looking through the viewfinder
5. Using the edge of the frame only with blank centers
6. A frame within a frame
7. Staying in one location for a thirty-minute period
Tuesday, September 13
Blog Post 3- Response to Editing Activity + Talking about Composition
1. Post two images from your own selection and two images from your classmates' selection to post to your blog. Along with those four images, write one paragraph reflecting on the images that were chosen. Were they different or the same? Why do you think they were chosen? You'll find a recap of exporting for the web on myCourses

Stephen Shore
South of Klamath Falls, U.S. 97, Oregon
July 21, 1973

Nicholas Nixon
Bebe and I

Larry Sultan
Los Angeles, Early Evening
1986
Monday, September 12
Access to Lightroom
A few students have reached out about not having Lightroom on their laptops. You guys will have to go into the lab when you want to use Lightroom. This means whenever you want to do some editing, print your photos or, like this weekend's homework, make a contact sheet. You are by no means expected to have Lightroom on your laptops, which is why we have Lab Hours for you guys. Sorry if I did not make this clear!
The lab will be open tonight 5:00-10:00pm and tomorrow 12:30-2:00pm.
Students who didn't have hard drives on Thursday:
Go to myCourses > Course Files > Tutorials for directions on how to
-Format your hard drive
-Create a catalog
-Import to Lightroom
For the future: you can find the Lab Schedule hung on the door of the lab and on here in the "Useful Links" panel on the sidebar to the right ----->
Sunday, September 11
Creating Contact Sheets
Follow the directions in the following video to create a contact sheet of your images: https://helpx.adobe.com/lightroom/how-to/lightroom-create-contact-sheet.html
 Under Print Job,
Important Points:
-Select 4x5 Contact Sheet
-Have nothing checked under Image Settings
-Under Page, only check Photo Info
The video tutorial does not go over the Print Job tab, so these are the directions on how to export your contact sheet for your blog, not for printing:
 Under Print Job,
1. Uncheck Draft Mode Printing
2. Set the Print Resolution at 300ppi
2. Set the Print Resolution at 300ppi
3. Uncheck 16 Bit output
4. Click Printer... at the bottom and a dialogue box opens up
5. In the lower left corner, select Save as a PDF
When you save, please change the name of the file
ex: Ryan_ColorTheory_ContactSheet.pdf
6. Click Save
7. You can't post a pdf file on your blog, so you'll have to
7. You can't post a pdf file on your blog, so you'll have to
make one last change. Open the pdf file in Acrobat and
save it as a PNG. If you have numerous pages for
contact sheets, it will save each page individually.
Be sure to post all the pages on your blog.
Thursday, September 8
Blog Post 2- Color Theory
Choose one primary color from the Color Wheel. For the next four days, you will search for and observe this color in your everyday life and environment. Learn to be hyper aware and observant of that color and document it with your camera. You may find this walking to class, in the dining hall, at the store, your car, getting ready for school, etc. Focus on documenting the color in numerous environments, landscapes and/or portraits. You may only shoot the color that you chose or an analogous color. Shoot 30 frames that contain that color within the next 48 hours and perhaps into the weekend. You may only edit in camera, I will be checking the sequencing and metadata of these files.
You must follow the rules listed below:
1. Define what Primary, Secondary, and Tertiary Colors are in regards to color theory.
2. Avoid more than three repetitious moments, if so, you must change the angle, focal length, lens, distance to subject, composition....etc.
3. In your menu settings, set the date and time to today's date.
4. Shoot 30 frames...or more.
5. You may use analogous colors.
6. You may only edit in camera and keep photo sequence numbers in order.
7. Import files to your catalogue in Lightroom.
8. Export and post contact sheets to your blog. Here is a link on how to make a contact sheet in LR5: http://tv.adobe.com/watch/learn-lightroom-5/creating-a-contact-sheet/. Also look at the post to follow called "Creating Contact Sheets"
9. Contact sheets must have Photo Info checked on, showing the file name
10. In your blog post, explain why you chose the color that you did. Please list five things that this particular color symbolizes for you.
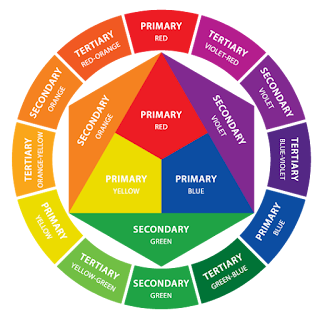
Analogous colors are colors that are close to one another on the color wheel that create a certain feeling or mood.
Complimentary colors are opposite each other on the color wheel. An example would be the colors Red and Green. Often complimentary colors are used in Art and Design.
Be familiar with Hue, Tint, Tone and Shade.
CMYK=Subtractive color. In the CMYK color model used in color printing, the primary colors magenta, cyan and yellow make black and the complementary pairs are magenta-green, yellow-blue, and cyan-red.


You must follow the rules listed below:
1. Define what Primary, Secondary, and Tertiary Colors are in regards to color theory.
2. Avoid more than three repetitious moments, if so, you must change the angle, focal length, lens, distance to subject, composition....etc.
3. In your menu settings, set the date and time to today's date.
4. Shoot 30 frames...or more.
5. You may use analogous colors.
6. You may only edit in camera and keep photo sequence numbers in order.
7. Import files to your catalogue in Lightroom.
8. Export and post contact sheets to your blog. Here is a link on how to make a contact sheet in LR5: http://tv.adobe.com/watch/learn-lightroom-5/creating-a-contact-sheet/. Also look at the post to follow called "Creating Contact Sheets"
9. Contact sheets must have Photo Info checked on, showing the file name
10. In your blog post, explain why you chose the color that you did. Please list five things that this particular color symbolizes for you.
Analogous colors are colors that are close to one another on the color wheel that create a certain feeling or mood.
Complimentary colors are opposite each other on the color wheel. An example would be the colors Red and Green. Often complimentary colors are used in Art and Design.
Be familiar with Hue, Tint, Tone and Shade.
CMYK=Subtractive color. In the CMYK color model used in color printing, the primary colors magenta, cyan and yellow make black and the complementary pairs are magenta-green, yellow-blue, and cyan-red.
Here are some examples of how to approach shooting primary colors:

Willian Eggleston
Snak Shak, Montezuma, Georgia
1976

Alec Soth
Bonanza Motel
2006

Paul Graham
Ashtray on Table, Morley's Cafe, Markham Moor, Nottinghamshire
February 1981

Alec Soth
Rebecca (from the series Niagara)
2006

Alec Soth
The Voyageur (from the series Niagara)
2006

William Eggleston
Untitled
c. 1975

Paul Graham
Interior of Cafe, Londonderry, North Yorkshire
September 1981
September 1981
Subscribe to:
Comments (Atom)